Shooting 102
This is a post geared towards those who have attended an Appleseed shoot and then have asked: "what next?"
Disclaimer - when it comes to shooting, there are many avenues to explore. No answer is a wrong answer with one exception: to no longer shoot is a bad choice. Always seek to improve (or at least maintain), no matter the direction.
NRA Highpower
One avenue for persons who shot well at Appleseed and now are looking for the next challenge is to shoot NRA Highpower. This is actually the course of fire (COF) upon which the Appleseed "AQT" was built.
Tactical Training
Another avenue for improvement is within the world of tactical training. Here is where you will learn how to fight with your rifle (and/or pistol). Put that marksmanship to work and learn how to put shots on targets at realistic ranges and under realistic circumstances and do so while under stress.
Sport Shooting
I differentiate here between NRA Highpower - which is clearly a shooting sport - from the more action oriented sports such as IDPA, 3-gun, and the like. These sport shooting venues will help you work on more applicable skills.
Personal Training
This is the big catch. You can train whatever you want. However, if you want to train your Appleseed skill into something practical (for hunting, self defense, etc.), then you will need to make a few changes. This is actually going to make up the bulk of this post, as this is where most people find themselves.
Let's take those skills from Appleseed, and make them practical. We will talk about positions and strategies, as well as keeping it all within the confines of what you will actually be able to practice at a range, and what you will need to practice on your own - preferably on private land.
Standing for hunting
If you are hunting, and need to take a well aimed shot from standing, then you will want to modify your hold just a bit from what Appleseed teaches. Your support hand should be as close to perfectly up-and-down as possible.

Standing for self defense
If you are in a self defense training mode, then you will need more speed. You will sacrifice comparable accuracy, but you gain mobility, and the ability to switch targets more rapidly.
First, here is a suggestion on how to carry the rifle. There are other methods, all of them have merit and demerit. Find what works best for you and your platform. Here's what I have worked on:

Transition. Note the right hand grips the pistol grip and the left hand is snatching the sling (to keep it out of the way) while getting into a good support position:

Here we are in position. I grip the magwell. Some say don't do it. I also practice with a forward grip sometimes as an alternative. Note the tucked elbows - NO CHICKEN WINGS!

As an alternative - here is the same position with the support hand forward. Although this is a relatively new posture, it has merit. Put it in the toolbox.

Alternately, for both hunting and fighting, use a supported position while standing for situations when precision is needed. Here I am using a porch rail. You could also use a tree, rock, car, or whatever else is handy:

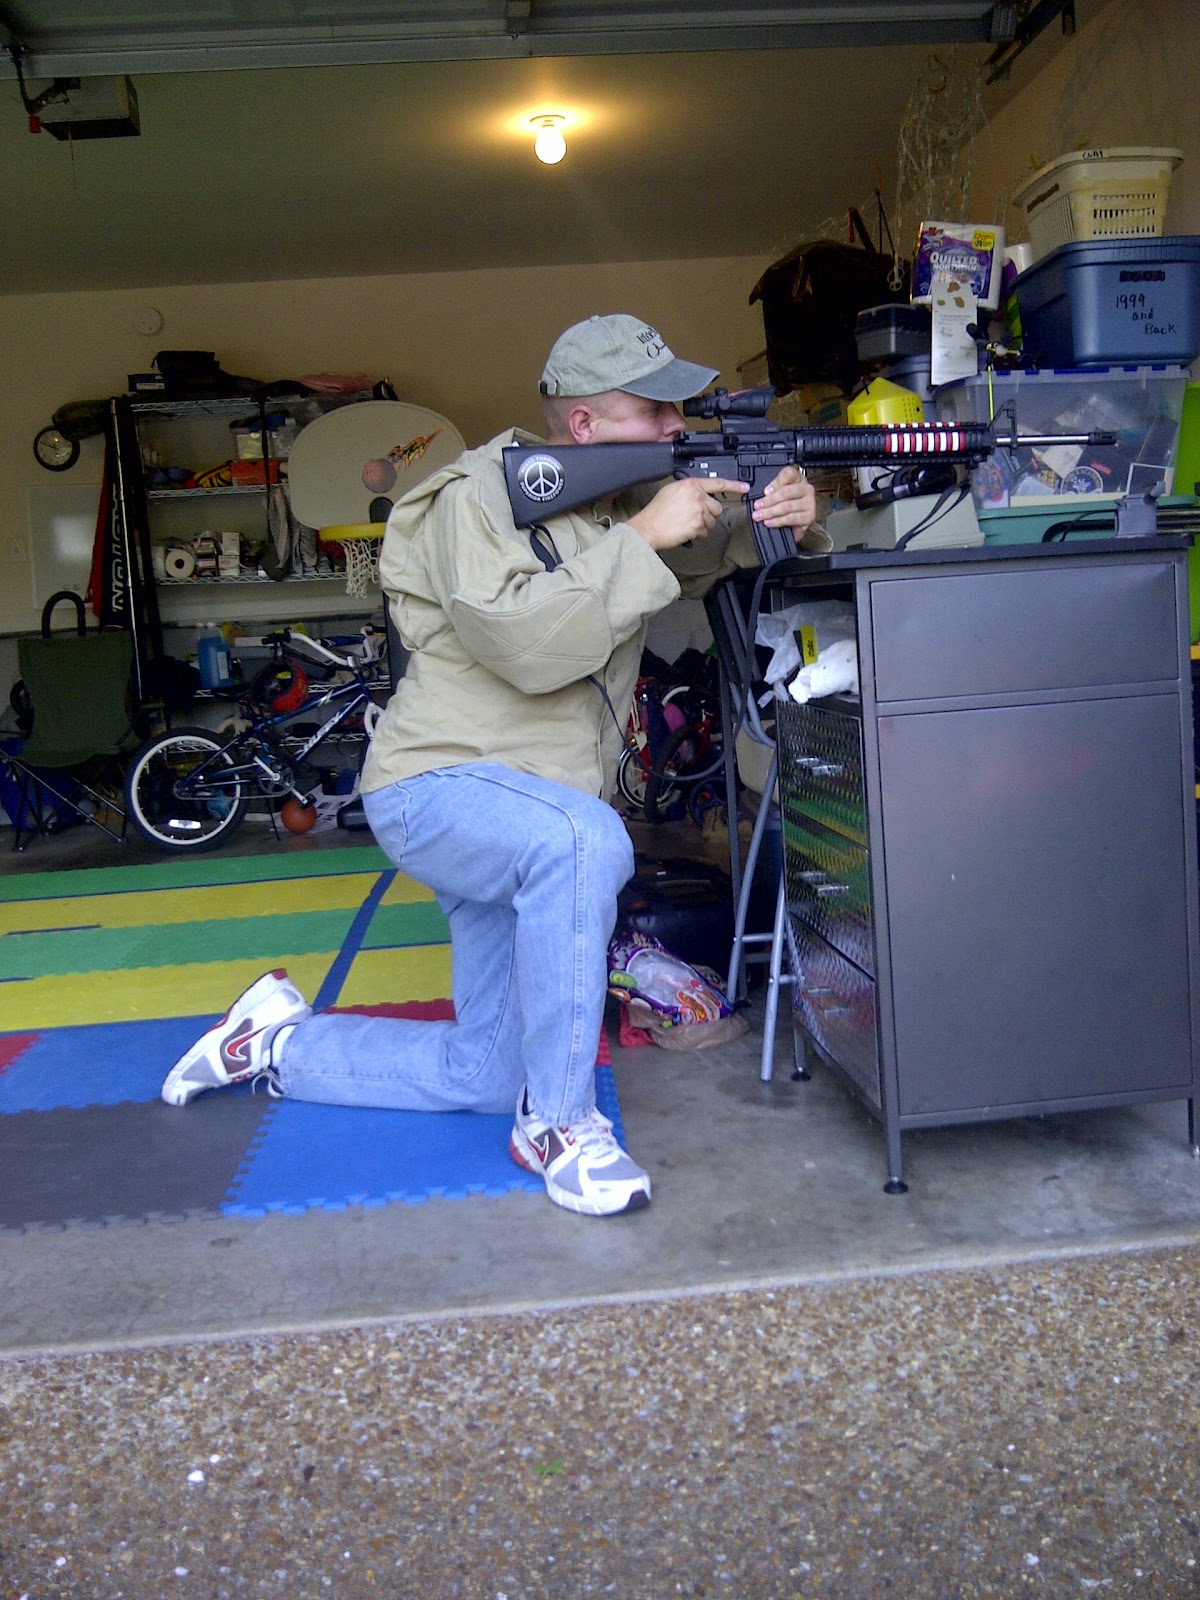
Sitting / kneeling for hunting or fighting
Sitting or kneeling for hunting and / or fighting is substantially similar. The only main difference would be in a fighting situation, one would want to be behind cover or concealment.
Here it is without support for help:

Here it is with support:

Depending on the situation, you can prop the rifle on the forend or the magazine. Use the magazine to prop it up if you have no bipod:

Prone for hunting or fighting
Prone position is prone position. The last thing you need to do is to think that you will have time to sling up to take a prone shot. It's just not happening. Even if you do, then you also have time to rest the rifle, which is even more stable. So prop that rifle up!
Here is a traditional angled approach, like what is taught at Appleseed. Note the bent leg behind my firing hand. Also note that I am angled off to the side:

When propping on the magazine (or a bipod, if you have one on the rifle), you can also position yourself directly behind the rifle. I like to use "live feet" (toes dug in a bit) for counter-pressure as well as mobility in case I need to stand. Like this:

Close picture of propping the rifle. Note the lack of use of the sling. It is not needed when firing prone.

Rifle
I hope you enjoyed and can use some of these techniques. They work with your main battle rifle or with a Liberty Training Rifle (LTR). These positions will be more advantageous for you than those taught at Appleseed. Only if you are going to shoot NRA highpower, or teach at Appleseed will you ever need the "field" positions they teach.
Rifle choice
All pictures here are taken with the AR15 - the Patriot Rifle of Choice. If you want to handicap yourself by having an M1 or M1A as a main battle rifle, then please do. There is a reason the AR platform is used and the M1 and M14 were replaced.
The real choice should be barrel length (14.5", 16", 18", 20", and 24" being the most popular), barrel type (government profile, lightweight, fluted, HBAR, or other) stock length and type, and whether to free float. I use a 20" for velocity, HBAR for accuracy, free floated quad rail for a combination of accuracy and accessorizing. Stats to come.
Magazine choice
It is worthy to note that rarely would one walk around with mags prepped with 2 rounds or 8 rounds. My AR15 pictured above uses 30-round magazines. I have a couple of 20-rounders, but they offer no advantage in any position (even in Appleseed / Highpower prone with sling).
Mag changes
Also worthy of note is mag changes. When needed, they should be done with the support hand - not the firing hand!
The USMC dropped the 2 & 8 requirement in 2005 because when slung tight, it is impossible to change mags with the support hand. Recruits were learning to change mags with the firing hand, then having to relearn in infantry school where all mag changes are done with the support hand. Train like you fight!
Statistics -
Rifle:
20" Stainless Steel E.R. Shaw HBAR (heavy barrel) from Model 1 sales.
A2 stock from Bushmaster.
Flat top upper from Palmetto State.
Bolt carrier group and charging handle from Palmetto State.
Pistol grip from Magpul.
Free float quad rail from YHM - "Diamond" rail.
Lower from Surplus Ammo & Arms.
National Match trigger from RRA.
ACOG from Trijicon.
Rail cover index clips from LaRue.
Quick-Detach (QD) mount from LaRue.
Sling from Blackhawk.
BUIS 1: MATECH. 30 clicks right windage.
BUIS 2: Carry handle (unknown manufacturer). 30 clicks right windage. 3 clicks down from MATECH.
Me:
Nike walking shoes - size 13.
Hanes socks.
Wrangler jeans - size 38x30. Can wear 36x30, but it is snug.
Carhartt t-shirt - size XL-Tall. Again, I could wear Large-Tall, but it is snug.
Shooting jacket from Made by Mcron - size XL; tan color.
I prefer a half size larger for shooting. Loose is better.
Special Thanks:
To my son, Cael, who took all these photos, except the one of himself here:

I like his new "Spikey" hair do. It is like his girlfriend's-older-brother's hair.
Disclaimer - when it comes to shooting, there are many avenues to explore. No answer is a wrong answer with one exception: to no longer shoot is a bad choice. Always seek to improve (or at least maintain), no matter the direction.
NRA Highpower
One avenue for persons who shot well at Appleseed and now are looking for the next challenge is to shoot NRA Highpower. This is actually the course of fire (COF) upon which the Appleseed "AQT" was built.
Tactical Training
Another avenue for improvement is within the world of tactical training. Here is where you will learn how to fight with your rifle (and/or pistol). Put that marksmanship to work and learn how to put shots on targets at realistic ranges and under realistic circumstances and do so while under stress.
Sport Shooting
I differentiate here between NRA Highpower - which is clearly a shooting sport - from the more action oriented sports such as IDPA, 3-gun, and the like. These sport shooting venues will help you work on more applicable skills.
Personal Training
This is the big catch. You can train whatever you want. However, if you want to train your Appleseed skill into something practical (for hunting, self defense, etc.), then you will need to make a few changes. This is actually going to make up the bulk of this post, as this is where most people find themselves.
--------------------------------------------------------------------------------------------------------
GET PRACTICAL
Let's take those skills from Appleseed, and make them practical. We will talk about positions and strategies, as well as keeping it all within the confines of what you will actually be able to practice at a range, and what you will need to practice on your own - preferably on private land.
Standing for hunting
If you are hunting, and need to take a well aimed shot from standing, then you will want to modify your hold just a bit from what Appleseed teaches. Your support hand should be as close to perfectly up-and-down as possible.

Standing for self defense
If you are in a self defense training mode, then you will need more speed. You will sacrifice comparable accuracy, but you gain mobility, and the ability to switch targets more rapidly.
First, here is a suggestion on how to carry the rifle. There are other methods, all of them have merit and demerit. Find what works best for you and your platform. Here's what I have worked on:

Transition. Note the right hand grips the pistol grip and the left hand is snatching the sling (to keep it out of the way) while getting into a good support position:

Here we are in position. I grip the magwell. Some say don't do it. I also practice with a forward grip sometimes as an alternative. Note the tucked elbows - NO CHICKEN WINGS!

As an alternative - here is the same position with the support hand forward. Although this is a relatively new posture, it has merit. Put it in the toolbox.

Alternately, for both hunting and fighting, use a supported position while standing for situations when precision is needed. Here I am using a porch rail. You could also use a tree, rock, car, or whatever else is handy:

Sitting / kneeling for hunting or fighting
Sitting or kneeling for hunting and / or fighting is substantially similar. The only main difference would be in a fighting situation, one would want to be behind cover or concealment.
Here it is without support for help:

Here it is with support:
Depending on the situation, you can prop the rifle on the forend or the magazine. Use the magazine to prop it up if you have no bipod:

Prone for hunting or fighting
Prone position is prone position. The last thing you need to do is to think that you will have time to sling up to take a prone shot. It's just not happening. Even if you do, then you also have time to rest the rifle, which is even more stable. So prop that rifle up!
Here is a traditional angled approach, like what is taught at Appleseed. Note the bent leg behind my firing hand. Also note that I am angled off to the side:

When propping on the magazine (or a bipod, if you have one on the rifle), you can also position yourself directly behind the rifle. I like to use "live feet" (toes dug in a bit) for counter-pressure as well as mobility in case I need to stand. Like this:

Close picture of propping the rifle. Note the lack of use of the sling. It is not needed when firing prone.

Rifle
I hope you enjoyed and can use some of these techniques. They work with your main battle rifle or with a Liberty Training Rifle (LTR). These positions will be more advantageous for you than those taught at Appleseed. Only if you are going to shoot NRA highpower, or teach at Appleseed will you ever need the "field" positions they teach.
Rifle choice
All pictures here are taken with the AR15 - the Patriot Rifle of Choice. If you want to handicap yourself by having an M1 or M1A as a main battle rifle, then please do. There is a reason the AR platform is used and the M1 and M14 were replaced.
The real choice should be barrel length (14.5", 16", 18", 20", and 24" being the most popular), barrel type (government profile, lightweight, fluted, HBAR, or other) stock length and type, and whether to free float. I use a 20" for velocity, HBAR for accuracy, free floated quad rail for a combination of accuracy and accessorizing. Stats to come.
Magazine choice
It is worthy to note that rarely would one walk around with mags prepped with 2 rounds or 8 rounds. My AR15 pictured above uses 30-round magazines. I have a couple of 20-rounders, but they offer no advantage in any position (even in Appleseed / Highpower prone with sling).
Mag changes
Also worthy of note is mag changes. When needed, they should be done with the support hand - not the firing hand!
The USMC dropped the 2 & 8 requirement in 2005 because when slung tight, it is impossible to change mags with the support hand. Recruits were learning to change mags with the firing hand, then having to relearn in infantry school where all mag changes are done with the support hand. Train like you fight!
Statistics -
Rifle:
20" Stainless Steel E.R. Shaw HBAR (heavy barrel) from Model 1 sales.
A2 stock from Bushmaster.
Flat top upper from Palmetto State.
Bolt carrier group and charging handle from Palmetto State.
Pistol grip from Magpul.
Free float quad rail from YHM - "Diamond" rail.
Lower from Surplus Ammo & Arms.
National Match trigger from RRA.
ACOG from Trijicon.
Rail cover index clips from LaRue.
Quick-Detach (QD) mount from LaRue.
Sling from Blackhawk.
BUIS 1: MATECH. 30 clicks right windage.
BUIS 2: Carry handle (unknown manufacturer). 30 clicks right windage. 3 clicks down from MATECH.
Me:
Nike walking shoes - size 13.
Hanes socks.
Wrangler jeans - size 38x30. Can wear 36x30, but it is snug.
Carhartt t-shirt - size XL-Tall. Again, I could wear Large-Tall, but it is snug.
Shooting jacket from Made by Mcron - size XL; tan color.
I prefer a half size larger for shooting. Loose is better.
Special Thanks:
To my son, Cael, who took all these photos, except the one of himself here:

I like his new "Spikey" hair do. It is like his girlfriend's-older-brother's hair.


Comments
Post a Comment
Your comment will be displayed after approval.
Approval depends on what you say and how you say it.